Click on a link to any of our recent
newsletters, or just scroll down. Every month there are valuable tips and
hints on Microsoft Excel, Maximizer and more! In Internet Explorer, you
can search this page for keywords using Ctrl+F. On our home page you can search this entire web site. Click
here for the list of ALL Newsletters.
Back: < 2006:
January –
< February –
< March – Below:
April –
May –
June – Forward: July 2006 >>
Back Issues: Sept 2000 - April 2001 –
May - Dec 2001 –
All 2002 – All 2003 –
All 2004 – All
2005
To subscribe to this
newsletter,
Click here and SEND the resulting e-mail now! We don't disclose your
e-mail address to anyone else. Promise!
Newsletter – April 2006
Editorial
This is the
month when autumn really happens, so get out the brooms and starting brushing
all those lovely leaves onto your borders to mulch them! Great water
saver!
Talking about
saving, Maximizer is on special this month so that you can upgrade to version
9.0. There is a 20% discount on the normal pricing, so it is a good time
to move in this direction. In addition, you can purchase a Product Upgrade Agreement,
which enables you to stay current at a much lower cost than previously.
Please
contact Judith at (011) 802-2685 for more details on this. Meanwhile,
enjoy the holidays!
Tired of Telkom? Travelling frequently out of normal 3G areas?
[Updated
December 2007: Due to their appalling service we no longer promote Gogga, but
can still provide an affordable connection to the internet independent of
Telkom, via M-Web and Vodacom. Click for
M-Web cell phone modem.]
Is your anti-virus package confusing you?
Are
you at the mercy of strange happenings, where you cannot access websites or even
get onto the Internet? Do you find that you cannot load new software
easily –and
it's not XP stopping you? It may be your overprotective anti-virus
solution that is the culprit.
Whilst we do want the best security, having to remember which thing to stop and
restart can make computing a nightmare. With eScan, you are trusted
to know that you want to load new software. Accessing the websites you
want is also simple. In fact, I recommend the Google toolbar for Internet
protection
–
free and in your control.
For
more information about eScan
– Contact
info@softwareafrica.co.za
PSNext – a true
Project Control solution from Management Planning Systems
Please
contact Judith for more information
Is your
mailshot blacklisting your domain?
Then MaxiMail
may be the answer. If you have had your marketing campaign blacklisted on
web servers, then you know what a problem this can be. If you have been
running a very large mailing list through Enterprise's Campaign Manager, you may
have found that your mail out takes a very long time.
MaxiMail
overcomes these problems by accessing the bulk mailing facility offered by
Cybertrenz, a dynamic young ISP in Rivonia. We liked their program I-Mail and asked if we
could link it to Maximizer to make a really powerful solution for Maximizer
users. We now have a tested product – MaxiMail.
This solves not
only large mail outs, but handling the unsubscribes and subscribes, so that your
mailing lists stay up to date. Please contact us for more information.
Pastelizer
7.8.13 and 8.8.13 Released
Another month,
another new version of Pastelizer!* The latest (build 13,
appropriately enough!) caters for the Pastel "13th month". This is where
Pastel allows you to run a month into the new financial year without closing off
your previous year's accounts: Pastelizer now allows you to do recurring billing
during this period too. To view the changes,
click here.
You can download Pastelizer from the internet and run it as demo
for testing purposes, or just download the extensive HTML Help File. For
information and prices, and to download a copy, visit
www.softwareafrica.co.za/pastelizer.htm.
*Pastelizer
copies Customer data from Maximizer to Pastel and financial information from
Pastel to Maximizer. This allows you to separate the Accounting roles from
Sales and Marketing, and buy fewer Pastel licenses. You can create
individual or bulk invoices in Pastel out of Maximizer, and optionally transfer
customer data from Pastel to back Maximizer.
Excel Tips
29 – Basic Functions: Copy & Paste Special (Values)
This month's
tip arises from a user's question. She had an Excel spreadsheet that was
to be imported into Maximizer, but the dialling code and telephone number were
in separate columns: How could they be combined into one column?
To demonstrate
the solution, set up a sample spreadsheet with column headings "Code" and
"Phone" in cells A1 and B1 respectively. Put some dialling codes and phone
numbers on the rows below (start the dialling codes with a single quote (') so
that Excel does not treat them as numbers and lose the leading zero).
Solution:
Find or insert a blank column to the right. In this column, on row 2,
enter the formula =A2&" "&B2 --we are using the ampersand (&) to
concatenate two strings (the
dialling code
in A2 and phone number in B2) with a space in between (inside double-quotes).
The formula should show the combined code and phone number. Now copy it
down all the rows that have data. To replace the contents of the "Phone"
column with the combined number, select and copy the formulas, select cell B2,
and Edit > Pastel Special > Values. This copies the answers to the
formula, over the old phone numbers. Delete the "Code" column (A) and the
formula column, and you are done!
With Excel's wide variety of
formulas, there are many ways you can manipulate your data using this method.
I use it for setting up blocks of repetitive Visual Basic code!
Next month we'll talk about how
you break up data that should be in different
columns!

Tips –
Some Administrator set ups for Opportunities
and Appointments in Enterprise
Version 9.0
The
simplicity of Maximizer Enterprise for the end user lies in the Administrator
set up of the various modules. Once these are correct, then you unleash
the power that really does "Attract new
prospects, Win new customers and
Increase repeat business"! Which is what
we all wish to achieve.
Thus
the set up of the system in the Administrator is key to how well utilised
Maximizer will be by your users.
The areas which are key to set up are:
-
Mandatory Fields
-
Key Fields
-
Opportunity
-
Campaign
-
System Fields
-
Customer Service
Please bear in mind that there are other set up areas which must be completed as
well, and these will be covered next month.
To
set up all of the above, you open the Administrator, and then go to File >
Preferences and choose the appropriate tab.
Mandatory Fields
These are the fields which are pre-set up in Maximizer. Here you can
decide which of them must be filled in when a new company and contact are
captured. For instance, is the fax number essential? Do you require
the Account Manager to be filled in?
By
editing these fields, you can change their status from Optional to Mandatory
with a few exceptions which are mandatory within the system.
This
has the advantage of the data being captured being exactly what is required to
meet the company's needs.
Key Fields
The
key fields are those which appear in the company and contact record, when you
double click on it. There are various categories for these fields, and
they set up to use a specific one according to their status. The
categories are as follows:
-
Company Lead
-
Company - Non Lead
-
Individual - Lead
-
Individual - Non Lead
-
Contact - Lead
-
Contact - Non Lead
-
Opportunity
-
Campaign
-
Customer Service
Each
one can have a particular group name assigned to it. You do this by adding
a Key Field List, giving it a name and description and then choosing one
of the above groups to form your key field display, like so:
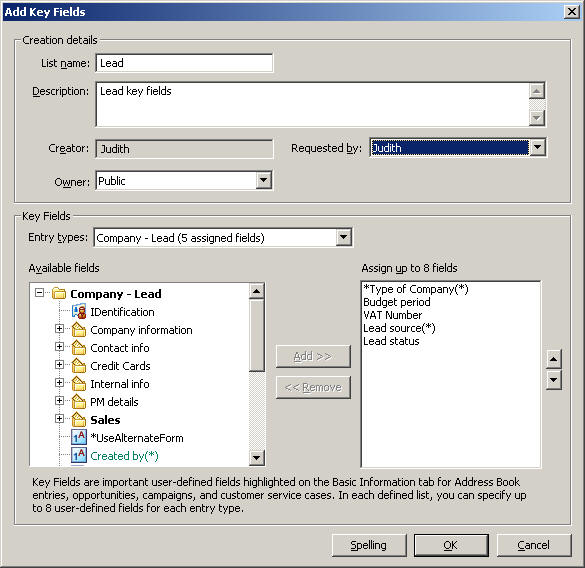
I
chose mine from our User Defined Field (UDF) list. Obviously, you would
use the appropriate ones from your UDF list.
You
can then go onto complete a list for each category.
Opportunity
This
is more time consuming and in fact one of the most critical areas to complete -
otherwise you don't receive the results that you want in your Opportunity
reporting!
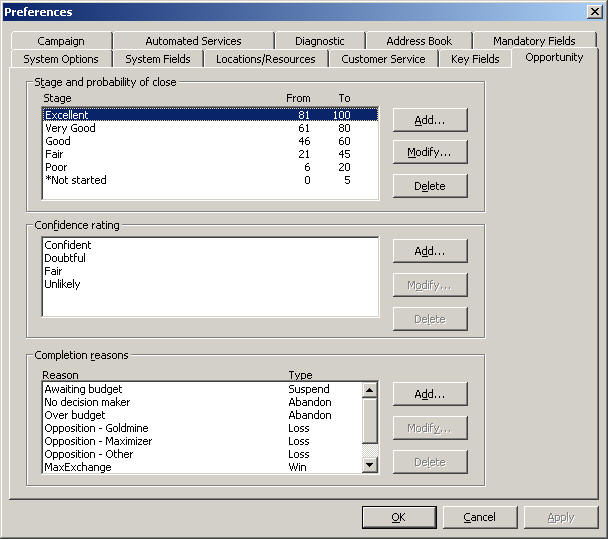
Notice here that there are three areas which affect the Opportunity:
The
first is the one which affects the overall rating - just feeling confident under
the Confidence Rating doesn't cut it!. Note that the weightings here must
stage up to a total of 100. Decide on your process and then put in the
figures to match it..
The
Confidence Rating is your gut feel around the customer. This will be
supported by the stage at which the process is indicated to be in by the first
group.
Completion reasons help you to see what your edge was in the closing of the sale
or where you lost out. You have four possibilities here - Win, Suspend,
Abandon and Loss. Choose the most likely reasons for each and
then your staff can utilise them in their sales process.
Campaign
This
one is very simple. Here are some ideas:
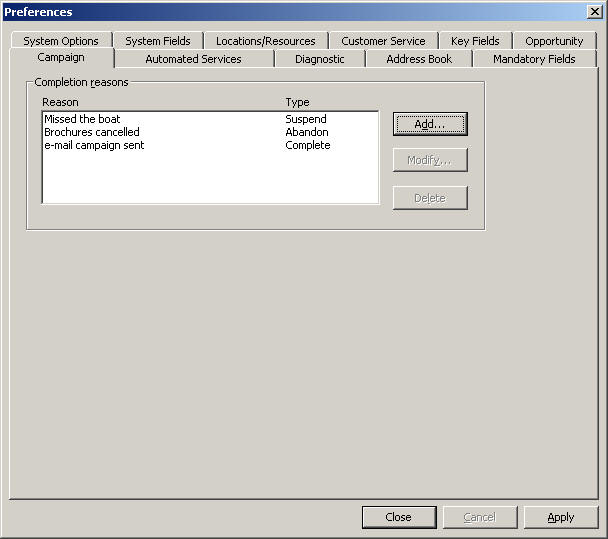
You
can have more than three and they don't need to be as simple as those
illustrated above!
Customer Service
Another key area for setting up. This one can be quite time consuming, as
you will need to put in a large amount of information:

As
you can see from this screen capture, you can define just about everything!
To do a correct set up, you will need to click on each of the Available
Fields and see what values you need to add to them.
If
reaction time is critical, then you will want to set up a Default Case
Response Time. Your Default Case Status can be Unassigned
or any of a number of options.
Actions
Do not allow direct changes to Status (actions only)
When this box is checked, users can't change the value of the Status field
in Customer Service cases, except through the Resolve Case, Assign Case,
Escalate Case dialog boxes.
Do not allow direct changes to Assignments (actions only)
When this
box is checked, users can't change the value of the Assigned To field in
Customer Service cases, except through the Resolve Case, Assign Case, Escalate
Case dialog boxes.
Case Monitoring
This
determines who in your team receives notifications about the case within your
company. By clicking on this button, you can include or exclude people.
Notification
Here
you can set up templates for notifying people, including the customer, of the
status of the case.
Creating Customer Service Case Email
Notification Templates
Maximizer can automatically email customers,
partners, and users when customer service cases are created, assigned,
escalated, or resolved. To set up customer service email notification, you must
create email notification templates through Administrator. You can create
separate templates for each action (create, assign, escalate, or resolve). Each
action can also have separate templates for emailing customers/partners and
users. Partners receive the same email notification as their associated customer
if the “Carbon Copy the associated Partner when notifying Customers” option is
selected. User notification emails are sent to the user(s) identified in the
Owner and Assigned To field for the case.
When writing the email templates, remember that
each template applies to all customer service cases of that notification event
type. They should be specific to the action they are assigned to but generic
enough to apply to all cases with that action. Use merge fields to personalize
emails based on generic templates.
Merge Fields in Customer Service Case Notification Templates
Merge fields in the email template personalize
the message for each recipient by replacing the merge field code with the actual
field value for that Address Book entry. For example, including the
{First_Name?} merge field in an email template would replace that code with each
email recipient’s actual first name.
Two merge fields that you might use in a case
resolution email message are Case_Solution and Case_Solution_Note:
-
Case_Solution includes the related
knowledge base article number.
-
Case_Solution_Note includes any notes
from the Solution Notes field in the Solution Information & Billing tab of
the Case dialog box.
For a complete list of merge fields to include in
the email templates, see the Insert Merge Field dialog box in the Maximizer Word
Processor. Press F1 when a field is selected to view its description.
You can create templates in either .ETF
(Maximizer Word Processor) or .HTML format. When creating templates in the
Maximizer Word Processor, simply click the Merge Field button and select the
merge field to insert into your email template. However, HTML templates are
created in an HTML or text editor, which does not contain the Maximizer merge
field selection dialog box. While you can manually type the merge field codes
into your HTML document, it’s easier to first create the template in the
Maximizer Word Processor and then copy the template (including the merge field
codes) into an HTML template.
Creating and Assigning Customer Service Case Email
Notification Templates
- In Administrator, select
File >
Preferences.
- Select the
Customer Service tab.
- Click the
Notification button.
The Customer Service
Email Notification Options dialog box opens.
- In the
Email templates for notification
group, select an Action Name.
- Click
Assign and select
Customer Template or
User Template.
The Email Notification
Template Library opens.
- To assign an existing
template, select the template from the list and click
OK. Then skip to step 11 of this
procedure.
– or
–
To create a new
template, click New and select
Maximizer Message Body (Maximizer Word
Processor .ETF template) or HTML Message Body
(HTML template).
The Message Body Name
dialog box opens.
- Type a name to identify the
template and click OK.
It’s a good idea to
include the action (Create, Assign, Escalate, or Resolve) and the recipient type
(Customer or User) in the template name, so the template is easier to identify.
- Create the template,
including customer service case merge fields where appropriate, and then
save and close the Maximizer Word Processor or HTML editor.
To insert merge fields
in Maximizer Word Processor, click the Merge Field
button. Some merge
fields relate specifically to customer service and automatically include
information such as the case number in the email message.
To use merge fields in
HTML email templates, you must type the merge field codes manually. To simplify
the process, you might choose to create the template with its merge field codes
in the Maximizer Word Processor, and then copy and paste the text into the HTML
document.
The template name now
appears in the Email Notification Template Library.
- Select the template and
click OK.
The template is now
associated with the action name for customers or users.
- To email the associate
partner when notifying a customer, select the
Carbon Copy the associate Partner when
notifying Customers option.
- Repeat steps 4 through 9 to
create or assign customer or user templates for other actions.
- Click
OK to save your changes and close the
dialog box.
The above is from Maximizer's Help files.
Useful Hint
– This is such an important area for the success of your Maximizer installation,
do some really sound pre-planning before starting your implementation!
Next month –
Security Groups and Teams
Remember: We can Help you with:―
·
Writing your custom databases on Microsoft Access, or custom programs in Visual
Basic. If you can’t find that piece of software to do things your way,
ask us!
·
Solving your Maximizer, Access, Excel, Word, and Lotus 123 problems.
·
Training your company on Maximizer, Excel, Word, Access and Windows. We do
all levels from beginners to Programming.
·
Software: We re-sell and support various CRM, timesheet, scheduling and
productivity programs.
All
the Best from the team!
Judith and Rick
Directors, Communication in Action (Pty) Ltd t/a Software Africa
PO Box
987, Gallo Manor, 2052
South Africa.
Tel: (+27 11) (011) 802-2685. Fax: 802-4576. Cell: 082 389-3481/2.
E-mail: info@softwareafrica.co.za
This entire newsletter is
Copyright© 2006 Communication in Action (Pty) Ltd.
Please share it with your friends or post it on your site as long as it
is left intact with all links unchanged and includes this notice. To
Subscribe to this newsletter, Click here and SEND the resulting e-mail.
Back to top
Editorial
It is the
merry month of May and we have a few more highlights on our recent
investigations into alternative software products, plus some information on
using packages. Please take a look at our
web site, as we have just revamped it and would love some
feedback.
Talking of
feedback - would you be so kind as to let us know one thing that we could
include in this newsletter, which would be of value to you and/or your company?
Thanks, as
this will really assist us in doing a good job for you.
New contact
number - we have a Maxicall number
086148 23 74
that
translates to
0861 IT Africa
Tired of Telkom? Travelling frequently out of normal 3G areas?
I know that
everyone is offering solutions these days, but Gogga still comes in at an
affordable price for connecting to the internet and declaring independence from
Telkom. The normal modem is currently retailing with the monthly package
at R499 and you then choose the package size that suits you. There is now
a 3G option:-
Broadband Gogga
This method of internet access is much faster than entry level and the package
costs are the same as for the lower speed modems.
The 3G
datacard taken with a 24 month package is bought at a once off cost of R1 249
including VAT but excluding postage and packing. Contact
info@softwareafrica.co.za for more information or to purchase your high
speed Gogga!
Is your anti-virus package confusing you?
Are
you at the mercy of strange happenings, where you cannot access websites or even
get onto the Internet? Do you find that you cannot load new software
easily
–and it's not XP stopping you? It may
be your overprotective anti-virus solution that is the culprit.
Whilst we do want the best security, having to remember which thing to stop and
restart can make computing a nightmare. With eScan, you are trusted
to know that you want to load new software. Accessing the websites you
want is also simple. In fact, I recommend the Google toolbar for Internet
protection
–
free and in your control.
For
more information about eScan
– Contact
info@softwareafrica.co.za
PSNext – a true
Project Control solution from Management Planning Systems
This
combines project tracking with predicting your sales pipeline, so that you have
a clear picture of prospective and current business for a powerful planning
solution. Please contact Judith for more information
How do you track employees' times?
Do you know
what is required in tracking time at work? Have you a clocking system or a
paper sign in and out system, which you archive? If you answer "No" to
these questions, then your business is vulnerable.
Time-Binder© gives you an electronic,
password and user ID protected program to track your employees easily.
TimeBase© gives you another way of tracking them and includes remote
employees reporting back to your head office. In this way you become
compliant with Labour Law.
Please contact
us for more information and for a demonstration. Both products can be
customised to meet your company's specific needs.
Sneak
Preview: Microsoft Office 2007 (Version 12)
The Office User
Interface (UI) is in for a major shake-up. Out go menus, toolbars and
dialog boxes. In comes a combination of them called the "ribbon".
Here's an example from Word 2007:

Near
the top, what looks like a menu (Write - Insert - Page Layout - References etc...–the
Ribbon) is
actually a series of Tabs, each of which opens a complex toolbar-like "gallery"
such as that shown above.
The tabs provide one-click access
to commands, much like the toolbars in previous releases but with the addition
of labels that help users identify the appropriate icon or button for a specific
command. By labelling items wherever possible, the Ribbon alleviates the need
for "ScreenTip surfing" or browsing menus —two of the most common, but most
inefficient, methods users employ to discover commands necessary to complete a
specific action.
Microsoft have sacrificed
uniformity (very similar menus in Word, Excel, and PowerPoint) for ribbons
devoted to the tasks people actually do in these programs (documents in Word,
spreadsheets in Excel, and whatever it is you do with PowerPoint [just
kidding!]). This is intended to make the program easier to use, and you,
the user, more efficient.
Office 2007 uses a concept called
"contextualization" which means that specialised commands that are not relevant,
will not just be greyed out (unavailable), they will not appear at all! So
make sure you click on the right object (e.g. table, picture) before you try to
find ways of changing it!
Now, when you click on an icon,
you will see the result immediately, instead of having to make all your changes
in a dialog box, then click OK and see if you liked the result. This is
certainly an advance. We are told that the old menus and dialogs are still
there if you want them.
Old-time Lotus 1-2-3 or WordPro
users will see a similarity between the Lotus InfoBox (which hovered over your
work and let you see results immediately) and Microsoft's new technology.
Convergent evolution? Following the leader? Idea theft? You
decide.
Excel Tips
30 – Parsing Data with "Text-to-Columns"
Last month we
looked at joining data from several columns into one. Now we'll look at
the opposite: How to split up data into several columns. For example,
suppose you had a column of addresses, with the individual "lines" separated by
commas, for example "PO Box 987, Gallo Manor, 2052".
You want to break this up into three columns.
Set up a sample
spreadsheet with a column containing a few addresses in this format.
Solution:
Select the data. Click Data > Test to Columns. A "wizard"
dialog box will pop up. Our first choice is "delimited", because we are
going to break up the data at commas. Click Next>>. The second step
is to choose the delimiter: Comma. Click Next>>. The third and final
step lets us define the data type. It is a good idea to click on each
column that could contain a postal code, and set its column data format to text.
That way you will not lose the leading zeros on Pretoria postal codes.
Click "Finish" and the data will be broken up into columns.
Next month:
Numeric Formats and formatting.
Tips –
Security Groups and Teams
in Enterprise Version 9.0
What is the purpose of these options? The main
one is to separate users into exclusive groups where they most appropriately
interact with the database. Another and essential aim to to make sure that
Opportunities go the correct mobile users. As you may have seen in the
Escona tutorial database, they have sales teams for specific areas.
Again, we use the Administrator module to create the
teams and security groups. Teams are aim at Sales and Marketing
specifically. Security groups can cover anyone in the organisation.
Open the Administrator Module and then File | Security Groups and Teams:
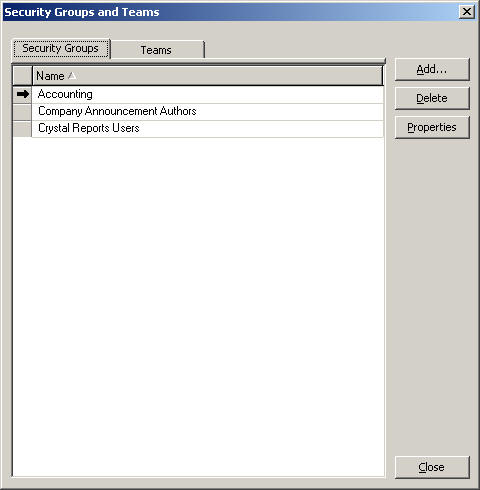
Note that the standard buttons to Add,
Delete and for Properties exist and that it opens in the Security
Groups area. The Properties button enables rights for the group to
be set.
These do not over-ride the individual's access
rights. As the Maximizer Help explains:
Group name and ID
Group Name
Name of the security group. Unlike the group ID, the group name can be
changed once created. Changing the name has no effect on the group
functionality.
Group ID
Unique ID of the security group. The Group ID is typically a briefer version
of the group name and not seen by users. A group ID cannot be changed once it is
created. If you ever need to recreate a security group, it is imperative that
you use the correct security group ID (the group name is irrelevant).
Access Settings
Allows you to set Access Settings for the selected group in the open Address
Book. These group access settings affect the user access rights of all users who
belong to the group. (User access rights are derived from their user access
settings and the access settings of any groups they belong to.)
It is important to note that granting a group access setting does not guarantee
that all members of the group will have that access right, depending on their
user access settings and the access settings of any other groups they belong to.
Permissions
Controls read, insert, modify, and delete permissions to Maximizer modules.
If a Read permission is denied (X), then the Insert, Modify, and Delete
permissions are automatically disabled. A user cannot have Insert, Modify, or
Delete permissions without having Read permission.
Address Book
Sets the security rights for viewing, adding, updating, and deleting Address
Book entries.
User-defined fields
Sets the security rights for viewing, adding, updating and deleting the values
of user-defined fields. This option does not control the ability to add
user-defined fields to the Address Book.
User-defined field setup
Sets the security rights for adding, updating, and deleting user-defined field
definitions.
Notes
Sets the security rights for viewing, adding, updating, and deleting notes.
Users must have the Delete checkbox selected to be able to use the File > Purge
> Notes function in Administrator.
Documents
Sets the security rights for viewing, adding, updating, and deleting documents.
Users must have the Delete checkbox selected to be able to use the File > Purge
> Documents function in Administrator.
Mailing Address
Sets the security rights for viewing, adding, updating, and deleting mailing
addresses for Address Book entries.
Company Library
Sets the security rights for viewing, adding, updating, and deleting files in
the Company Library.
OrderDesk
Sets the security rights for viewing, adding, updating, and deleting OrderDesk
entries.
Opportunities
Sets the security rights for viewing, adding, updating, and deleting
opportunities.
Strategy Library
Sets the security rights for viewing, adding, updating, and deleting Strategy
Library (Opportunity) information.
Campaigns
Sets the security rights for viewing, adding, updating, and deleting campaigns.
Customer Service
Sets the security rights for viewing, adding, updating, and deleting customer
service cases.
Knowledge base
Sets the security rights for viewing, adding, updating, and deleting knowledge
base articles.
User/Group Setup
Sets the security rights for viewing, adding, updating, and deleting another
user's or group's information.
§ If you do not have any User/Group Setup rights, other users’ or groups’
properties are not accessible.
§ If you have read rights only, the related tabs are visible, but information
cannot be modified.
§ Insert, Modify, and Delete rights provide the corresponding access rights to
all user and group properties.
Accounting
Applies to Accounting Link transactions. Note that the Delete permission is
disabled because Accounting Link transactions cannot be deleted through
Maximizer.
Action Plan Library
Sets the security right for viewing, adding, updating, and deleting Action plans
in the Action Plan Library.
Privileges
Allow Global Edit
Grants authorization to use the Global Edit item on the Maximizer Edit menu.
Global Edit is a powerful feature that modifies multiple Address Book entries
with a set of specified changes. For example, you could change the mailing
address for a company and its contacts simultaneously. Consider advising users
with this privilege to back up the Address Book before making significant
changes with Global Edit.
Allow private entries
Grants authorization to add Address Book entries that are not visible to other
users. The user can use the Owner, Full Access, or Read Access fields to create
private entries or restrict entries to a group.
Allow transfer and import/export
Grants authorization to transfer Address Book entries between Maximizer Address
Books or import/export Address Book entries to or from another application. The
only entries that cannot be transferred or imported/exported are encrypted
user-defined fields. Note that if you do not select this option, the menu items
for importing and exporting data are disabled. This option also applies to the
security right to export information to Excel.
Allow Sync Contacts with Outlook
If this checkbox is selected, the Synchronize Entries to Outlook command is
enabled on the Tools menu in Maximizer, and the icon is enable on the standard
toolbar.
Modify distribution field
Grants authorization to change the MaxExchange Distribution field of Address
Book entries.
Modify/delete other owners' notes
Change and delete other users’ notes. However, to be able to view other users’
private notes, the user must have the "Modify other users’ private entries"
privilege enabled.
Modify other users' private entries
View and modify entries marked as private that belong to other users.
If a user has this privilege enabled, the user has full read and modify access
to all entries, regardless of the entry’s Full Access, Read Access, or Owner
settings. This security privilege is very powerful and should be granted with
caution.
Modify other users’ general info
Change information in the General and User-Defined Fields tabs of the User
Properties dialog box for another user.
Modifying a user’s general information, such as Last Name, First Name, Company,
and Phone Number, does not have to be restricted to the MASTER user. In many
cases, an administrative assistant or a receptionist can be granted the rights
to modify user’s general information without compromising the security of
Maximizer. This privilege allows the user to have access to all Maximizer users’
general information without giving them full security rights to the Address
Book.
User’s roles
Customer Service Manager
Allows the user to have customer service cases assigned or escalated to him/her.
It also allows the user to change the value of the Case owner field.
If this role is assigned to a user, it is not necessary to assign the Customer
Service Representative role to the user because Customer Service Managers can do
everything Customer Service Representatives can do.
Customer Service Representative
Allows the user to have customer service cases assigned to him/her.
Knowledge Base Approver
Grants the user authorization to approve knowledge base articles. A newly
created article is assigned a draft status until it is opened and assigned a
different status by an approver. Press F1 in the Knowledge Base window for more
information.
Sales Manager
Allows the user to belong to the Account Manager field. Sales Managers can
also re-assign the Account Manager field to a different user.
Sales Representative
Similar to the Sales Manager role, Sales Representatives can be assigned to
the Account Manager field. A Sales Representative can assign the Account Manager
field to anyone else, but only if the Account Manager field was assigned to
him/herself or blank and not assigned to another user.
Allow printing to these destinations
Printing to certain destinations, such as file or HTML, can pose security risks
for your organization. For example, a user could print important data fields to
a file. This file would then contain information in a format that could easily
be transported elsewhere. Consider these security risks in balance with the
improved business processes that can be achieved by using print destinations
other than Printer.
Printer
Grants authorization to print to the default printer.
File (Rich Text Format)
Grants authorization to print to a .RTF file.
File (PDF Format)
Grants authorization to print to a .PDF file.
Email
Grants authorization to attach the report to an email message, usually in a
.RTF file.
HTML format
Grants authorization to print to a .HTM file.
Preview
Grants authorization to display a preview of the print output on the screen.
Custom Report
Open and print reports from the Reports > Crystal Reports menu in Maximizer.
Note that the user cannot create custom reports unless he or she is also a
member of the Crystal Reports Users security group. Note that the user can view
or create reports for only those Maximizer modules that he or she has
permissions to (in Access Rights).
©1988-2005 Maximizer Software Inc.
Please note that the same is true for standard user
access permissions.
Once you have set up the Access Rights for the
group, you click on the Members tab and add the appropriate people to
that group. Then you close this window.
When you add a new group, you type the group's name
in the the Name box and an ID is created.
Now click on the Teams tab:
Teams are different in that they do not have
permissions. They do however have members whose roles are defined for
them.
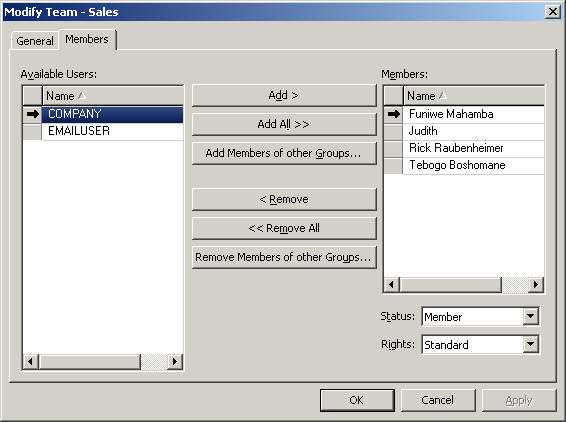
Notice that here you give the members status
and rights. Status comprises the following:
Member
Leader
The Leader will always have Edit
rights, whereas Members can have Standard or Audit rights.
To clarify this from Maximizer's Help:
Status
Assigns a Member or Leader status. There can be only one Leader per team and the
status cannot be changed once the team is created.
Rights
A team member has either edit, audit, or standard rights, as described below.
The team leader always has edit rights.
§ Edit: Allows a member full access to all campaigns and opportunities assigned
to the team. Members with this type of access have full team leader rights and
may modify the status of an opportunity or campaign and may also reassign tasks.
§ Audit: Allows a member to view all campaigns and opportunities assigned to
him/her.
§ Standard: Allows for basic rights to "work" (apply steps) opportunities and
campaigns. These rights do not allow the member to change a status of an
opportunity or campaign.
If you have someone in mind as a team member with edit rights, it saves time to
assign right in Administrator rather than on a per-campaign or per-opportunity
basis.
©1988-2005 Maximizer Software Inc.
Remember to include your managers in your teams so
that they can see what the team is doing. Generally, they should be the
team leader, but this might always be the case.
Next month –
Using and setting up MaxExchange
Remember: We can Help you with:―
·
Writing your custom databases on Microsoft Access, or custom programs in Visual
Basic. If you can’t find that piece of software to do things your way,
ask us!
·
Solving your Maximizer, Access, Excel, Word, and Lotus 123 problems.
·
Training your company on Maximizer, Excel, Word, Access and Windows. We do
all levels from beginners to Programming.
·
Software: We re-sell and support various CRM, timesheet, scheduling and
productivity programs.
All
the Best from the team!
Judith and Rick
Directors, Communication in Action (Pty) Ltd t/a Software Africa
PO Box
987, Gallo Manor, 2052
South Africa.
Tel: (+27 11) (011) 802-2685. Fax: 802-4576. Cell: 082 389-3481/2.
E-mail: info@softwareafrica.co.za
This entire newsletter is
Copyright© 2006
Communication in Action (Pty) Ltd.
Please share it with your friends or post it on your site as long as it is left
intact with all links unchanged and includes this notice.
To Subscribe to the newsletter, Click here and SEND the resulting e-mail. To
unsubscribe, Click here
and SEND the resulting e-mail.
Back to top
Newsletter
–
June 2006
Editorial
Please take a
look at our
web site, as we have just revamped it and would love some
feedback.
Speaking to a
printer supplier today, I found out that sales are good, in fact booming.
Sounds like the economy is moving forward and the big construction projects are
now filtering down into b2b demand again. This will keep us busy through
the winter, providing Eskom keeps us all powered up!
We are moving
into supplying a wider range of software again. Please ask us for pricing
on Microsoft solutions that you may require as well as Lotus Smart Suite (yes
there are still users out there!).
New contact
number - we have a Maxicall number
0861 48 23 74
that
translates to
0861 IT Africa
If you had a choice, where would you invest right now?
Would it be in the stock
market, your business, your family or yourself? Or somewhere else entirely?
How about visiting a few of the websites where a contribution can be made to
assist others like
https://www.guidedog.org.za/ or
https://www.cotlands.org/. There are many other institutions that can
give you great returns for your contributions, so do a local Yahoo search for
your favourite charity and warm a few hearts!
Is something missing in your workplace?
Would it be of value to you
to look at your data security? I ask this because recently one of our
suppliers had the misfortune to have all of their computer equipment stolen.
With it went all record of their invoicing, so now they are having to trust
customers to pay - they can't find out who owes them what at all!
Could this happen to your
company? Would you be in a similar situation? If the answer is
"Yes", then please contact Roy Westfehling of Westech and ask about his backup
solutions. His details are: Tel (011) 807-7457 and e-mail
roy@westech.co.za. Their website is
www.computersupport.co.za.
Tell him we sent you!
We have used their backup
system for over a year and have seamlessly recovered data.
Problems and Solutions - the Q&A of software
We are reinstating this part of
the newsletter. It used to be a regular in our old printed version.
Let us know if it is of use. Also, send us questions to answer!
Question: How do I
convert documents into Adobe PDF format?
Answer: Download CutePDF™
Writer from
https://www.cutepdf.com/Products/CutePDF/writer.asp. This is very
interesting link as they have put more products on the site.
Question: How do I number
sections in Word?
Answer: Go to Format |
Styles and Formatting. Choose Heading 1, right click on it and
select
Modify. Click on Format and choose Numbering.
Click on the Outline
Numbering tab and choose the style you want. Note that the numbering
will be applied to the lower level headings as well. Click OK, OK
and you will see the difference displayed.
Question: How can I
access the headings in Word quickly?
Answer: For Heading 1 use
Ctrl-Alt-1; Heading 2 Ctrl-Alt-2 and Heading 3 Ctrl-Alt-3.
For lower levels, you will require a macro to be written.
Question: How are these
heading levels used?
Answer: Heading 1 refers
to all the major sections and will number them 1, 2, 3 etc. Heading 2 is
your first level subsection and will number the heading will the major section
number followed by the subsection number - e.g. 1.1, 1.2, 1.3 etc. Heading
3 is the next level down and will show three numbers.
To give us more questions -
please
contact
info@softwareafrica.co.za
In
need of professional hardware support in the Randburg area?
If so, Supima Computers may
be your solution. They are situated in Bond Street and are another of our
partners. Contact Jessica on (011) 789-4076 or
jess@supimasa.com.
Position available
We are
looking for a sales person - ideally a young self starter who is computer
literate and has a driver's licence plus a vehicle. They would be employed
to sell software solutions including Maximizer CRM. Initially, they would
focus on contacting prospects for appointments and Judith would assist with the
presentations and do the quotes. Longer term, we expect them to grow into
successful sales professionals and do their own presentations and deals.
Part of the package would include their first year's membership of UPSA SA and
support in doing the exams of this professional society. On-the-job
training is also provided. Please contact Judith for more information on
(011) 802-2685 or by e-mail.
High level training in Excel
Do you feel
that you could be more productive if you had a greater understanding of Excel
and using its formulas? Then we can offer the Excel for Professional Users
course. This will cover how you can use Excel in order to maximize your
reporting skills and minimize the hassles! We will include using pivot
tables, What-If scenarios and other data analysis techniques. For a full
specification of this course and costs - please contact Judith as above.
Excel Tips
31 – Formats
In passing last month we
mentioned the
text data format.
Let's look at formatting in more detail...
If you select a cell or
range of cells and either click Format > Cells, or press Ctrl + 1, the following
dialog box pops up: (yours may be on a different tab - click the "Number" Tab,
the first one)
We'll briefly look through
the categories:
- General – no options here: This is exactly as
entered.
- Number – as above: You can set the number of decimal
places, the 1000 separator (usually a comma, but depends on your Windows
Regional Settings, as in fact does your decimal symbol), and how it treats
negatives.
- Currency – Similar to Number, but you can
select a currency symbol. The way negatives are treated (minus sign or
parentheses "()"), and the placement of the negative and the currency
symbol, depend on your Windows Regional Settings for Currency.
- Accounting – fewer options here: You can set the
number of decimal places and the symbol, but not how negative appear.
The currency symbols are lined up against the left margin:
Next month: Date and
Time Formats.
Tips –
Using and setting up MaxExchange
in Enterprise Version 9.0
This is the last part in the more complex features
of Maximizer for awhile. We are going to go back to simple solutions for
day-to-day users from next month.
In version 9.0, MaxExchange works far more
easily, as it runs as a service on the server. This was true from version
7.0 but it was not always reliable! Once you have installed MaxExchange,
or your Maximizer support partner has done so, you will need to set up the
users.
The normal way to set up the users is through
Site Manager. This is found in the Maximizer Administrator module
under Utilities. Initially, you set up the server and choose
whether the synchronisation will be via FTP, e-mail or the network. Of
these options, we have found that FTP is the best one with e-mail second.
Once you have chosen the synchronisation method and
set it up, you give access passwords to it. Keep these simple! You
then choose to activate the other options on this screen. They can be
altered at any time, if you require more information or warnings.
Then you move back to adding the users. In
order for the users to be able to access their opportunities, they will have to
be in a sales team. Click on the Team option and check that you
have the required teams displayed and their correct members.
Then click on Distribution Sites and add the
remote users one by one. Make sure that you fill in each screen with the
required information. Notice that you can prevent remote users from
deleting records.
Once this is done, ask for the user to be sent a
Refresh so that the database is sent down to the laptop, which is seen as a
Distribution Site in the MaxExchange UDF. Close Site Manager.
Now go to each user and configure their MaxExchange
to receive the refresh via your chosen method. Check that the refresh
arrives and set up their local database for it to be expanded into; finally set
up how often this remote synchronises with the server and whether it is
automatic or user directed.
Note: For users who do presentations, it is a
good idea to place the synchronising in the hands of the user! Then they
are not suddenly interrupted by being told the connection has failed - thank you
Leon (from Bateleur) for bringing this irritation to my attention!
Next month –
The Workflow cycle for beginners - a look at how Maximizer tracks your tasks
Remember: We can Help you with:―
·
Writing your custom databases on Microsoft Access, or custom programs in Visual
Basic. If you can’t find that piece of software to do things your way,
ask us!
·
Solving your Maximizer, Access, Excel, Word, and Lotus 123 problems.
·
Training your company on Maximizer, Excel, Word, Access and Windows. We do
all levels from beginners to Programming.
·
Software: We re-sell and support various CRM, timesheet, scheduling and
productivity programs.
All
the Best from the team!
Judith and Rick
Directors, Communication in Action (Pty) Ltd t/a Software Africa
PO Box
987, Gallo Manor, 2052
South Africa.
Tel: (+27 11) (011) 802-2685. Fax: 802-4576. Cell: 082 389-3481/2.
E-mail: info@softwareafrica.co.za
P.S. Visit our web site at
where you can find all sorts of
free stuff to
download.
This entire newsletter is
Copyright© 2006
Communication in Action (Pty) Ltd.
Please share it with your friends or post it on your site as long as it is left
intact with all links unchanged and includes this notice.
To Subscribe to the newsletter, Click here and SEND the resulting e-mail. To
unsubscribe, Click here
and SEND the resulting e-mail.